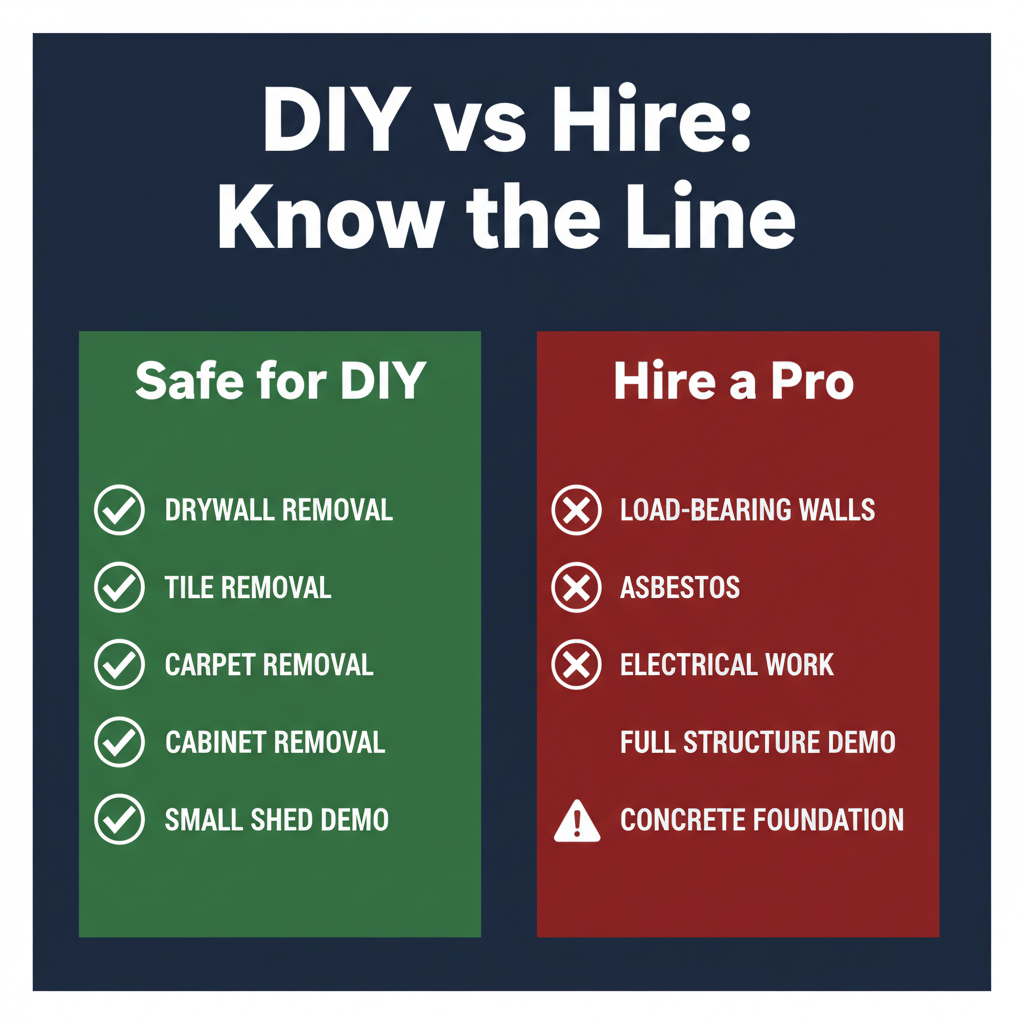
Can you do demolition yourself?
Yes — many homeowners can safely handle drywall, tile, carpet, cabinets, and small outdoor structures. Structural walls, asbestos, gas lines, electrical panels, and full building demolition should be handled by licensed professionals.
🔨 5 Checks Before You Swing a Tool
- ☐ Power off at breaker panel — verified with voltage tester
- ☐ Water supply off — main shutoff or fixture valves
- ☐ Load-bearing walls identified — confirmed by pro if unsure
- ☐ Asbestos checked — tested in pre-1980 homes
- ☐ Dumpster booked and on-site
Applies to United States. Permit, asbestos, and utility rules vary by municipality.
Why DIY Demolition?
Demo day is the one phase of a renovation where sweat equity pays off the most. Removing drywall, ripping out tile, tearing up old carpet, pulling cabinets — none of this requires specialized skills. It requires effort, the right tools, and basic safety awareness. A bathroom demolition that a contractor quotes at $1,500–$3,000 can be done yourself for the cost of a dumpster rental and a weekend.
But DIY demolition has real limits. Swing a sledgehammer into the wrong wall and you're looking at a structural repair that costs more than the entire renovation. Hit a live wire and you're in the emergency room. Pull apart old floor tile without checking for asbestos and you've created a hazardous exposure situation for your entire household.
This guide draws a clear line between what you can safely handle yourself and what needs a professional — so you save money where it makes sense and stay safe where it doesn't.
What DIY Demolition Can You Safely Do Yourself?
| Safe for DIY | Savings vs. Hiring | Difficulty |
|---|---|---|
| Drywall removal | $500–$2,000 | Easy |
| Tile removal (floor and wall) | $300–$1,500 | Moderate — hard on knees and back |
| Carpet and padding removal | $200–$600 | Easy |
| Cabinet and countertop removal | $300–$1,000 | Moderate |
| Non-load-bearing wall removal | $300–$800 | Moderate — must confirm non-load-bearing |
| Fixture removal (sinks, toilets, tubs) | $200–$500 | Easy to Moderate |
| Vinyl and linoleum flooring removal | $200–$800 | Moderate — adhesive is the hard part |
| Removing carpet and padding | $200–$600 | Easy |
| Shed demolition (small, no electrical) | $500–$2,000 | Moderate |
| Deck removal (ground level, wood) | $500–$2,000 | Moderate to Hard |
| Hire a Contractor | Why |
|---|---|
| Load-bearing wall removal | Requires structural engineering, header beam, permits |
| Asbestos-containing materials | Licensed abatement required by law — serious health hazard |
| Electrical panel or main lines | Electrocution risk — requires licensed electrician |
| Gas line work | Explosion and fire risk |
| Full house demolition | Heavy equipment, permits, hazmat, disposal logistics |
| Multi-story structural work | Collapse risk, fall hazard |
| Concrete foundation removal | Requires excavator or jackhammer — beyond DIY scope |
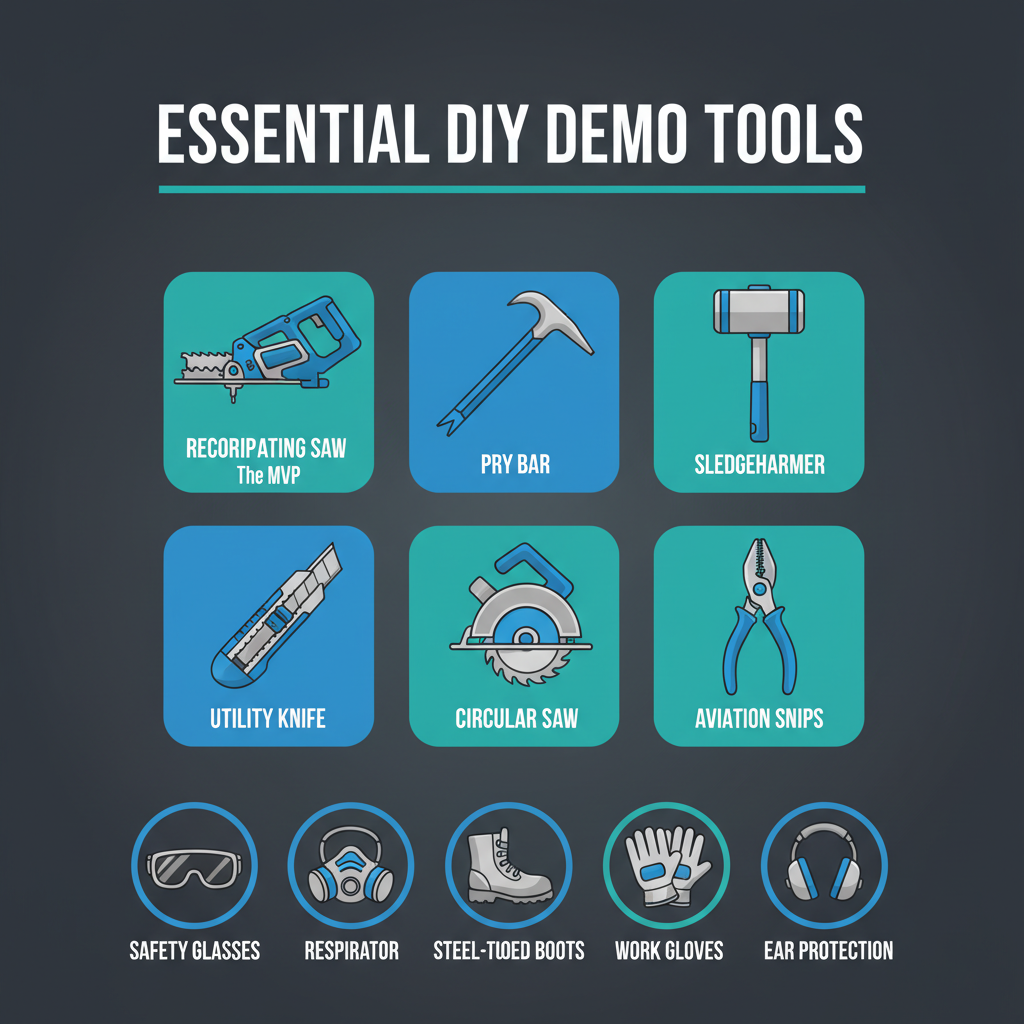
Essential Tools for DIY Demolition
You don't need a lot of tools for demo work, but the ones you do need matter. Here's what covers 90% of residential DIY demolition projects:
Reciprocating Saw
This is the single most useful demolition tool you can own. A reciprocating saw cuts through wood, drywall, nails, screws, metal pipe, and just about anything else you'll encounter during a remodel. With a demolition blade, it tears through stud walls in minutes. If you buy one tool for demo day, this is it. Budget $60–$120 for a corded model or $120–$200 for cordless.
Pry Bar and Crow Bar
A flat pry bar (12"–18") handles trim, molding, cabinets, and anything nailed to a wall. A longer crow bar or wrecking bar (36"+) gives you leverage for pulling framing, prying apart floor joists, and general heavy demolition. A set of small pry bars in different sizes is worth having for precision work around fixtures you want to keep.
Sledgehammer
An 8-pound sledgehammer handles most residential demo — drywall, plaster, breaking up tile, knocking out studs. A 12-pound sledge is overkill for interior work and will tire you out fast. For drywall specifically, you can skip the sledgehammer entirely and use your hands or a utility knife — it's faster and creates less dust.
Utility Knife
Cuts drywall, slices carpet, scores vinyl flooring, and trims just about anything. Keep extra blades on hand — demolition dulls them fast. A good utility knife is the cheapest tool in your kit and one of the most used.
Circular Saw
For cutting through subfloor, decking, sheathing, and framing lumber that's too thick for the reciprocating saw. Set the blade depth to match the material thickness so you don't cut into whatever's underneath — especially important when removing subfloor above a finished ceiling below.
Aviation Snips
For cutting sheet metal ductwork, metal strapping, flashing, and thin metal roofing. Much safer and more controlled than trying to use a saw on thin metal. Keep a pair in your pocket during demo — you'll use them more than you expect.
Safety Gear (Non-Negotiable)
Safety glasses — flying debris is constant during demo. A dust respirator (N95 minimum, P100 for anything involving old materials) — drywall dust, wood dust, and insulation particles are harmful to breathe. Steel-toed boots — you will drop heavy things. Work gloves — nails, splinters, and sharp edges are everywhere. Ear protection — reciprocating saws and sledgehammers are loud. This is not optional gear. Any contractor worth watching wears all of it. You should too.
Important Safety Tips Before You Demo
Identify load-bearing walls before you touch anything. A load-bearing wall supports the weight of the structure above it. Removing one without proper support will cause the ceiling, roof, or upper floor to sag or collapse. If you're not sure whether a wall is load-bearing, assume it is and get a professional opinion. The cost of a structural engineer's assessment ($300–$500) is nothing compared to a $10,000+ structural repair. Our wall demolition cost calculator can help you estimate professional removal costs.
Check for asbestos before disturbing any material in a pre-1980 home. Asbestos was used in floor tiles (especially 9"×9" tiles), popcorn ceilings, pipe insulation, drywall joint compound, roof shingles, and siding. Disturbing asbestos-containing material releases fibers that cause serious lung disease. Testing costs $25–$50 per sample through a mail-in lab. This is not paranoia — it's a basic precaution that takes two days and could prevent a life-altering health problem.
Turn off electrical circuits before opening any wall or ceiling. Even if you think a wall has no wiring, verify it. Use a non-contact voltage tester ($15–$25) on every surface before you swing a tool. Turn off circuits at the breaker panel and confirm they're dead with the tester. Electrical wires run through stud walls in ways that aren't always obvious from the outside.
Locate plumbing lines. Supply lines and drain pipes run through walls, floors, and ceilings. Hitting a supply line with a reciprocating saw or sledgehammer will flood the room in seconds. Know where your main water shutoff is before you start any demo work. If you're unsure where pipes run, turn off the water supply as a precaution.
Rent a dumpster before demo day. This sounds obvious, but many DIY renovators start demolition without a plan for the debris. A 10-yard dumpster ($250–$400 for a week) handles most single-room demos. A 20-yard dumpster ($350–$500) covers a full kitchen or bathroom gut. Having the dumpster on-site when you start keeps the workspace clear and prevents dangerous debris pileup.
How to Demo a Room: Step by Step
Whether you're gutting a bathroom, kitchen, or bedroom for a renovation, the demolition sequence is the same. Working in the right order is safer, faster, and creates less damage to things you're keeping.
Step 1: Protect what stays. Cover hardwood floors with rosin paper and plywood if you're keeping them. Seal doorways with plastic sheeting to contain dust. Cover HVAC vents with plastic and tape to keep dust out of your duct system. Remove doors from hinges and store them. This prep takes an hour and saves days of cleanup.
Step 2: Remove fixtures and appliances. Take out light fixtures, outlets covers, switches, and anything mounted to walls or ceilings. In a kitchen, disconnect and remove appliances. In a bathroom, remove the vanity, toilet, and shower fixtures. Turn off water supply to fixtures before disconnecting — and have a bucket ready for residual water in the lines.
Step 3: Remove cabinets and built-ins. Cabinets are typically screwed to wall studs through a mounting rail at the top. Remove shelves and doors first to reduce weight, then unscrew the cabinet boxes from the wall. Work from top to bottom — upper cabinets first, then base cabinets. If you plan to reuse or donate the cabinets, take care during removal. If they're going to the dumpster, pry them off faster.
Step 4: Strip the walls. Remove tile from walls using a pry bar and hammer — work from the top down to let gravity help. Remove drywall by scoring it with a utility knife and pulling it off in sheets, or punch through with a hammer and pry it away from studs. Plaster and lath is messier — pull the plaster off first, then pry the wood lath strips from the studs. Bag or shovel debris as you go rather than letting it pile up on the floor.
Step 5: Remove flooring. Carpet pulls up by hand — grab a corner, pull, and roll. Cut it into manageable strips with a utility knife for easier hauling. Vinyl and linoleum are harder — score with a utility knife and scrape with a floor scraper. Tile floors require a hammer and cold chisel or a rotary hammer with a chisel bit. For large tile areas, rent a walk-behind floor scraper ($200–$300/day) — it's dramatically faster than working on your hands and knees.
Step 6: Remove framing (if applicable). If you're taking out non-load-bearing walls, cut the studs at mid-height with a reciprocating saw and pry each half away from the top and bottom plates. Then pry the plates from the floor and ceiling. Knock studs sideways rather than pulling straight out — the nails release easier with lateral force.
Step 7: Clean up and inspect. Once everything is stripped to studs (or whatever your remodel starting point is), sweep and vacuum thoroughly. Inspect what's exposed — check for water damage, mold, pest damage, outdated wiring, or plumbing issues. This is the moment to find problems before the rebuild starts. It's much cheaper to fix a rotted floor joist now than after new tile is installed on top of it.
DIY Demolition by Project Type
Bathroom Demolition
A full bathroom gut is one of the most common DIY demo projects. Remove the vanity, toilet, and tub or shower surround. Tile removal is the most labor-intensive part — wall tile comes off with a pry bar and hammer, floor tile needs a chisel or rotary hammer. Gut to studs takes a handy homeowner one full day for a standard bathroom. Budget $200–$400 for a dumpster and disposal.
Kitchen Demolition
Kitchen demolition is bigger but follows the same sequence. Disconnect and remove appliances, then upper cabinets, then base cabinets and countertops. Remove the backsplash tile. Pull up flooring. A full kitchen gut takes 2–3 days DIY. The biggest challenge is the sheer volume of debris — a standard kitchen produces 3–5 cubic yards of material.
Drywall Removal
Drywall removal is the easiest and most satisfying DIY demo work. Score it, punch it, pull it. A single room can be stripped to studs in 2–3 hours. The dust is the main issue — wear a respirator and seal the room with plastic sheeting. Pull drywall screws with a drill rather than ripping the drywall off with them still in — it's cleaner and faster to deal with the studs afterward.
Tile and Flooring Removal
Tile removal is the most physically demanding DIY demo work. Floor tile set in a thick mortar bed is brutal by hand — seriously consider renting a power scraper for anything over 50 square feet. Wall tile is easier because gravity works in your favor. When removing carpet, check for hardwood floors underneath before assuming you need new flooring — many older homes have solid wood floors hidden under decades of carpet and padding.
Shed and Deck Demolition
Small shed removal and ground-level deck teardown are straightforward outdoor DIY projects. Start from the top down with the roof, then walls, then floor. The main challenge is disposal — you'll need either a dumpster or a truck and multiple dump runs. Metal sheds unscrew in panels and can go to a scrap yard for recycling.
When to Hire a Contractor Instead
The line between DIY and professional work isn't about difficulty — it's about consequence. A crooked tile removal is fixable. A missing load-bearing wall is not.
Load-bearing walls. Any wall that supports the structure above it requires a structural engineer to design a header beam system before removal. The wall removal itself costs $1,500–$5,000 with a contractor, and the structural engineering assessment costs $300–$500. Doing this wrong can cause ceiling collapse, roof sag, and foundation shifting — repairs that run $10,000–$50,000.
Asbestos abatement. If testing confirms asbestos in your tile, drywall compound, insulation, or ceiling texture, stop. In most U.S. jurisdictions, asbestos removal requires licensed abatement. The cost varies ($1,500–$5,000 for a residential project), but the fines for improper removal start at $10,000 and the health consequences are permanent.
Full structure demolition. Tearing down a house, barn, or garage requires heavy equipment (excavators, grapple trucks), demolition permits, utility disconnection, and professional debris management. These projects also require liability insurance — if your DIY demolition damages a neighbor's property or injures someone, you're personally liable.
Concrete breaking. Removing a concrete slab, foundation, or driveway requires a jackhammer or excavator-mounted breaker. While you can rent a jackhammer, it's exhausting, slow, and the debris is extremely heavy. A 4" concrete slab weighs roughly 50 pounds per square foot — a 200 sq ft slab is 5 tons of material you need to break, load, and haul.
How to Salvage and Reuse Building Materials
Demo doesn't have to mean everything goes to the landfill. Many demolition materials have reuse or recycling value — and keeping them out of the dumpster reduces your disposal costs.
Lumber and framing: Clean dimensional lumber (2x4s, 2x6s) without rot or nails can be reused in other projects or donated to Habitat for Humanity ReStore locations. Old-growth lumber from pre-1950 homes is often higher quality than what's available at lumber yards today.
Cabinets and fixtures: If kitchen cabinets, bathroom vanities, sinks, and toilets are in usable condition, donate them or list them for free pickup. ReStore, Craigslist, and Facebook Marketplace all move these items quickly.
Metal: Copper pipe, steel framing, aluminum window frames, and metal roofing all have scrap value. Separate metals during demo and take them to a scrap yard. Copper is especially valuable — a full kitchen or bathroom remodel can yield $50–$200 in copper scrap.
Hardwood flooring: Salvageable hardwood planks can be reinstalled in other rooms or sold to reclaimed wood dealers. Careful removal with a pry bar (pulling up boards individually rather than demolishing them) preserves the material.
Brick and stone: Reclaimed brick has value for landscaping, accent walls, and patios. If your demo includes an interior or exterior brick wall, careful deconstruction preserves the material for resale or reuse.
FAQ
Can I demo a house by myself?
Partial interior demolition is a common DIY project — removing drywall, tile, flooring, cabinets, and non-load-bearing walls are all within reach for a handy homeowner. Full house demolition is not a realistic DIY job. It requires heavy equipment, demolition permits, utility disconnection, hazardous material handling, and professional debris disposal. The cost to demolish a full house ranges from $6,000 to $25,000 with a contractor.
What are the 4 methods of demolition?
The four primary demolition methods are: mechanical demolition (using excavators and heavy equipment), deconstruction (hand-dismantling to salvage building materials), implosion (controlled explosive demolition for large commercial structures), and selective demolition (removing specific elements while preserving the rest). Most residential DIY work falls under selective demolition.
Do I need a permit for demolition?
It depends on the scope. Removing non-structural elements like drywall, tile, flooring, cabinets, and fixtures typically does not require a demolition permit. Removing load-bearing walls, full structure demolition, and any work involving asbestos does require permits. Check with your local building department before starting structural work.
What tools do I need for DIY demolition?
Essential DIY demolition tools: a reciprocating saw (the most versatile demo tool), a pry bar or crow bar, a sledgehammer, a utility knife, a circular saw, aviation snips, a drill for removing screws, and a shop vacuum. For safety: safety glasses, work gloves, a dust respirator, steel-toed boots, and ear protection.
How much can I save with DIY demolition?
DIY demolition typically saves 50–70% compared to hiring a contractor. A bathroom gut that costs $1,500–$3,000 professionally can be done DIY for $200–$500 in dumpster and disposal costs. Kitchen demo saves $1,000–$3,000. The savings come from eliminating labor costs — you still pay for disposal and any tool rentals.
What demolition should I NOT do myself?
Never DIY: load-bearing wall removal (requires structural engineering), asbestos-containing material removal (requires licensed abatement), electrical panel or main line work, gas line disconnection, full structure demolition, and any work above single-story height without proper scaffolding. The risk of injury, structural damage, or code violations outweighs any savings.
Related Calculators
Estimate your project costs before you start demo day:
- Bathroom Demolition Cost Calculator — Full gut to studs or partial strip
- Kitchen Demolition Cost Calculator — Cabinets, counters, flooring, full gut
- Drywall Removal Cost Calculator — Per room or whole house
- Tile Removal Cost Calculator — Floor, wall, and countertop tile
- Wall Removal Cost Calculator — Load-bearing vs non-load-bearing
- Interior Demolition Cost Calculator — Full interior gut estimates
- Shed Removal Cost Calculator — Outbuilding teardown
- Deck Demolition Cost Calculator — Deck and patio removal